Customize your Windows TerminalPersonaliza tu Windows Terminal
| #tutorial, #windows, #terminalFollow these 20 steps in order to make your terminal look amazing.Sigue estos 20 pasos en orden para dejar tu terminal increíble.
Each step matches a specific action shown in the screenshots.Cada paso corresponde a una acción específica mostrada en las capturas.
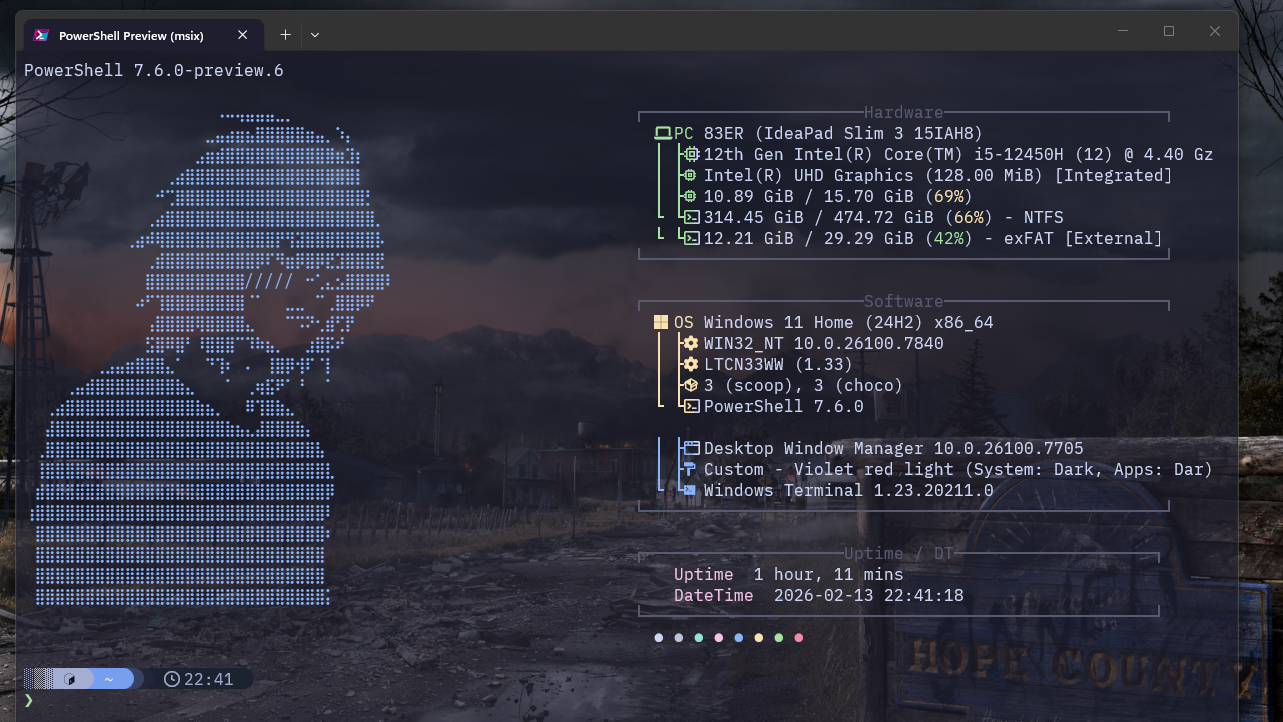
1. Downloading PowerShellDescargando PowerShell 📥
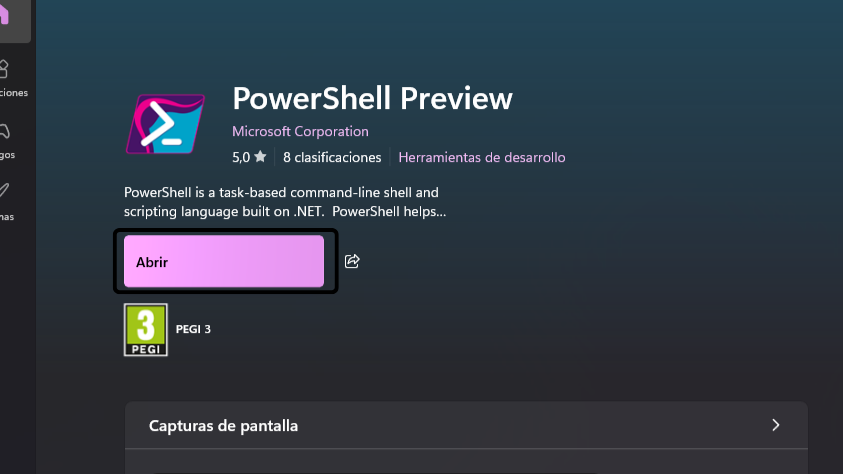
Open the Microsoft Store and search for "PowerShell". Download specifically the version shown in the image: PowerShell Preview (not the regular one).Entramos a la Microsoft Store y buscamos "PowerShell". Descargamos específicamente la versión que se observa en la imagen: PowerShell Preview (no la versión normal).
You can also use this direct link to download it: PowerShell Preview on the Microsoft Store.También puedes usar este enlace directo para descargarla: PowerShell Preview en Microsoft Store.
2. Initial SetupConfiguración Inicial ⚙️
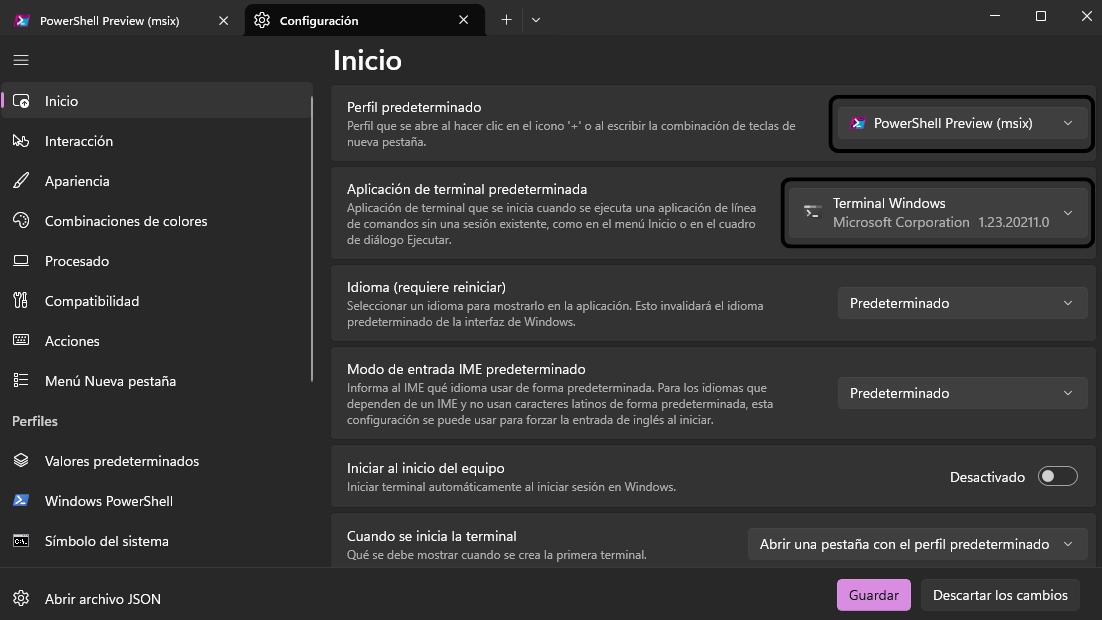
Open whatever terminal you're using right now. Click the down arrow (▼) in the tab bar and choose "Settings".Abrimos la terminal que estemos usando actualmente. Hacemos clic en la flecha hacia abajo (▼) en la barra de pestañas y seleccionamos "Configuración".
In the "Startup" section, find Default profile and pick the PowerShell version we just installed. Right below, in Default terminal application, make sure to select "Terminal" (or Windows Terminal).En la sección "Inicio", busca Perfil predeterminado y selecciona la versión de PowerShell que acabamos de instalar. Justo debajo, en Aplicación de terminal predeterminada, asegúrate de seleccionar "Terminal" (o Windows Terminal).
3. DefaultsValores Predeterminados 🎨
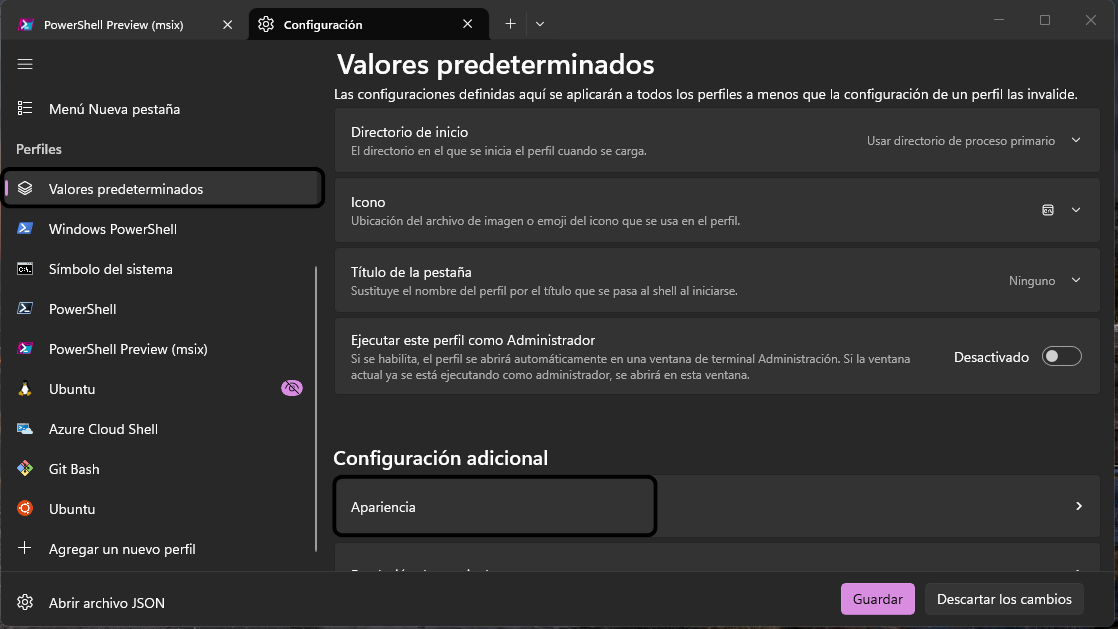
In settings, go into "Defaults" and, under "Additional settings", click "Appearance". We do this here so all terminals (Git Bash, CMD, etc.) look equally nice and consistent.En la configuración, entramos en "Valores predeterminados" y, en "Configuración adicional", le damos a "Apariencia". Hacemos esto aquí para que todas las terminales (Git Bash, CMD, etc.) se vean igual de bonitas y unificadas.
4. Adjusting OpacityAjustando la Opacidad ✨
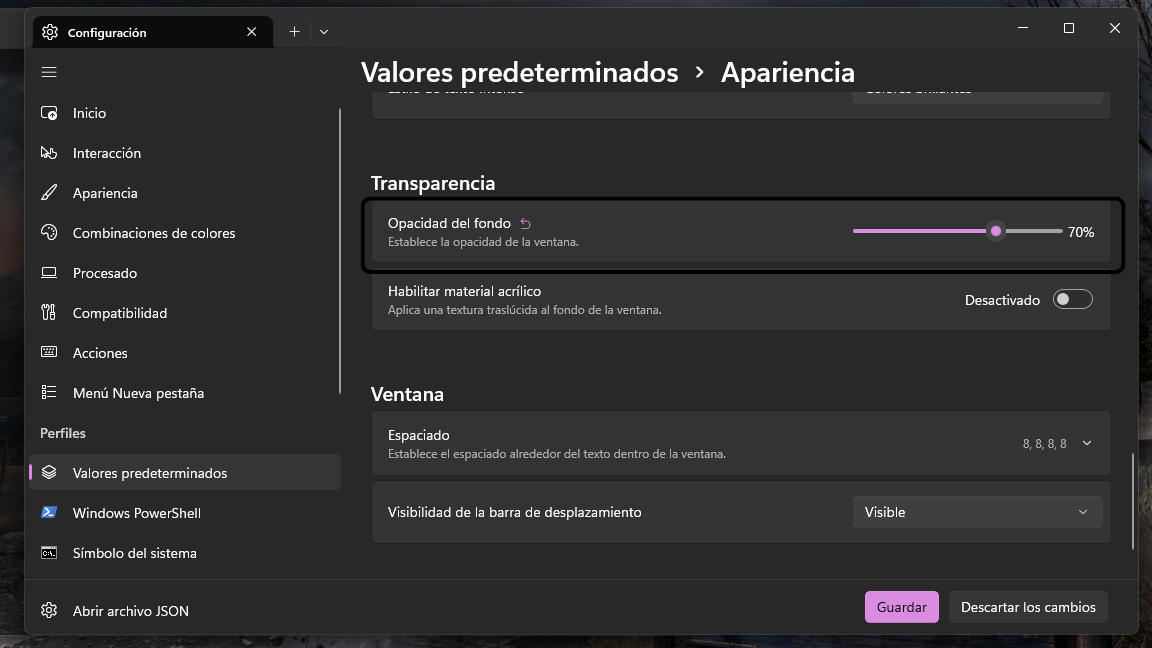
Scroll down to the "Transparency" section and, under "Background opacity", pick the percentage you like best.Bajamos hasta el apartado de "Transparencia" y, en "Opacidad de fondo", seleccionamos el porcentaje que más nos guste.
5. Downloading Fonts (Nerd Fonts)Descargando Fuentes (Nerd Fonts) 🔡
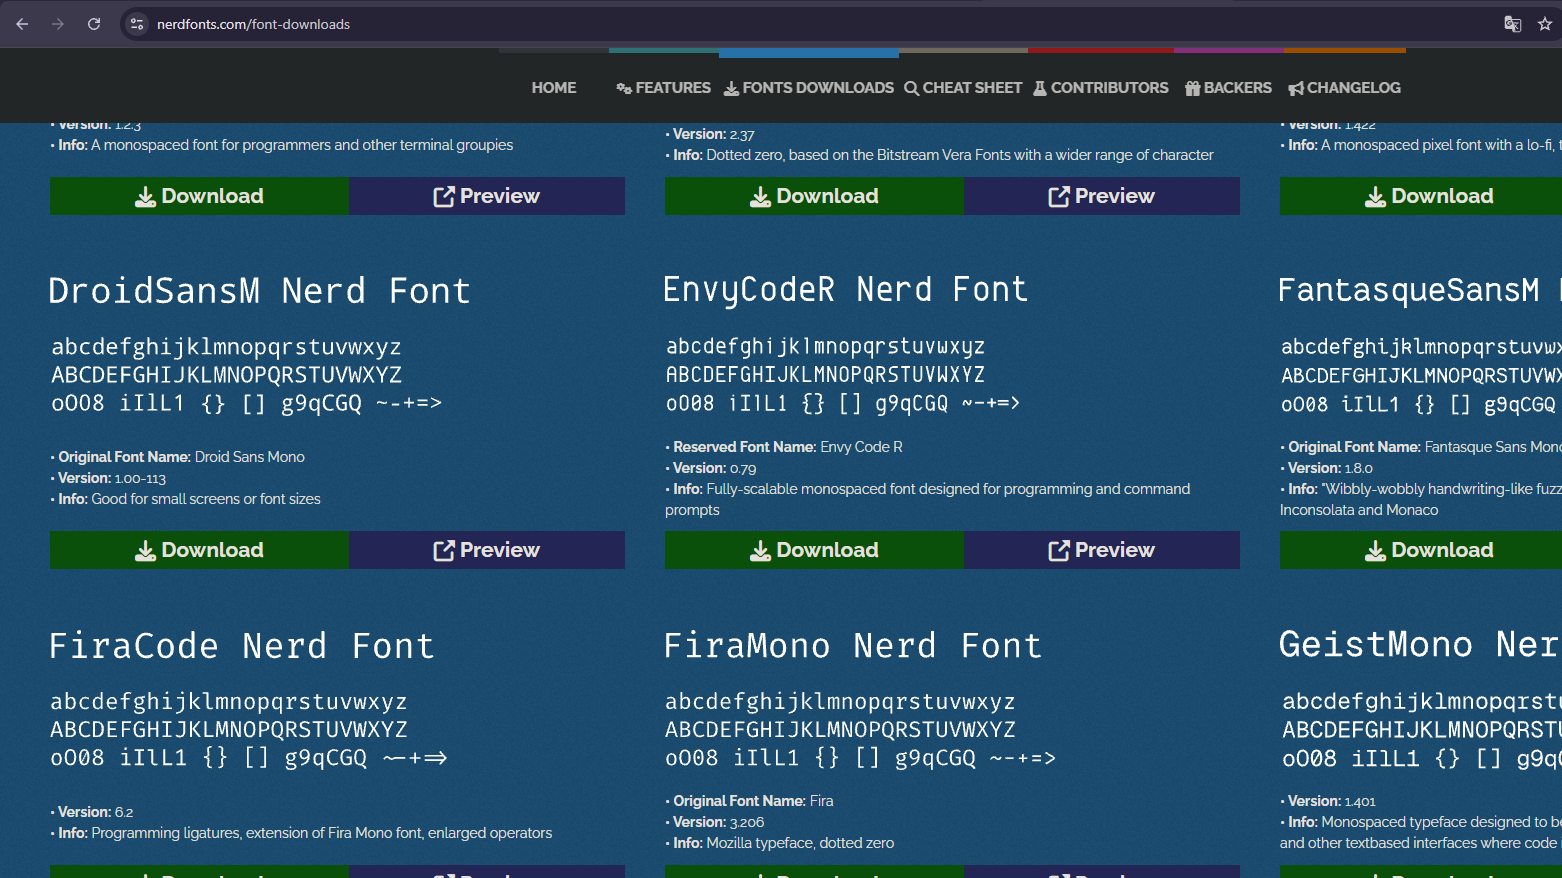
Head to this page to download fonts: Nerd Fonts Downloads.Vamos a esta página para descargar fuentes: Nerd Fonts Downloads.
In my case I downloaded FiraCode because I like it, but you can pick whichever you prefer.En mi caso descargué FiraCode porque me gusta, pero tú puedes elegir la que prefieras.
6. Installing the FontInstalando la Fuente 📂
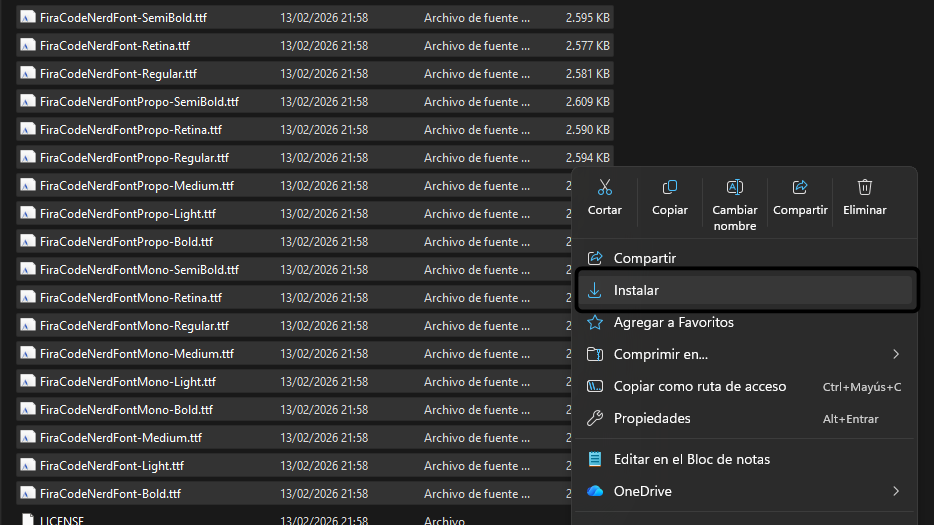
Extract the downloaded file. Select all the files with the .ttf extension, right-click and choose "Install".Extraemos el archivo descargado. Seleccionamos todos los archivos con extensión .ttf, hacemos clic derecho y elegimos "Instalar".
7. Applying the FontAplicando la Fuente 🛠️
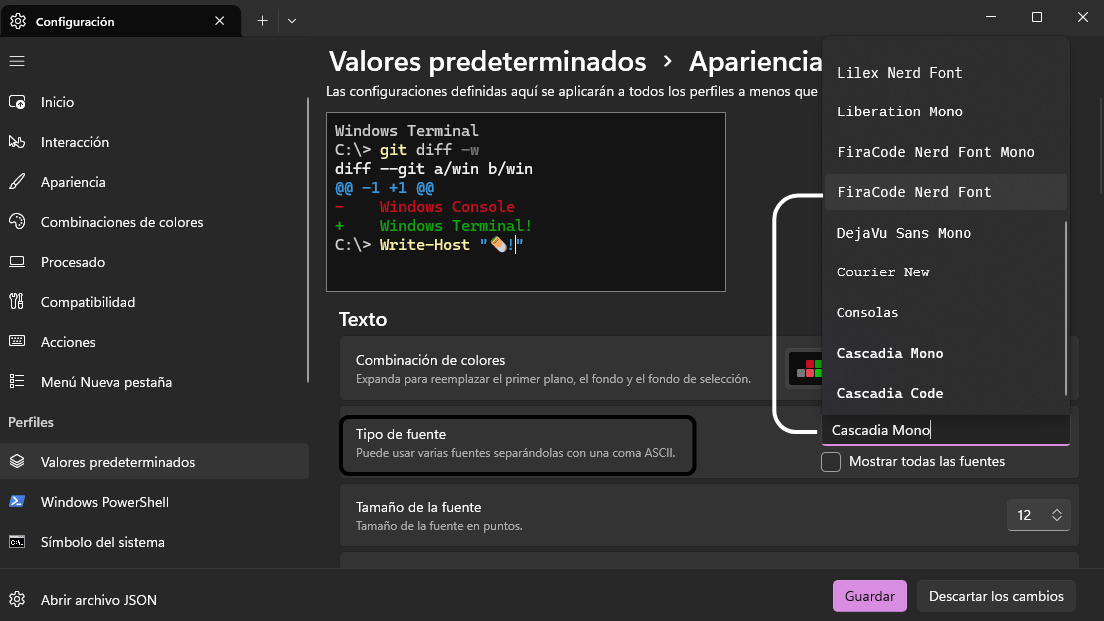
Back in the Terminal, go to the "Appearance" section and "Font face". Find and select the font we just installed.Volvemos a la Terminal, en la sección de "Apariencia" y "Tipo de fuente". Buscamos y seleccionamos la fuente que acabamos de instalar.
8. Opening the Settings JSONAbriendo el JSON de Configuración 📄
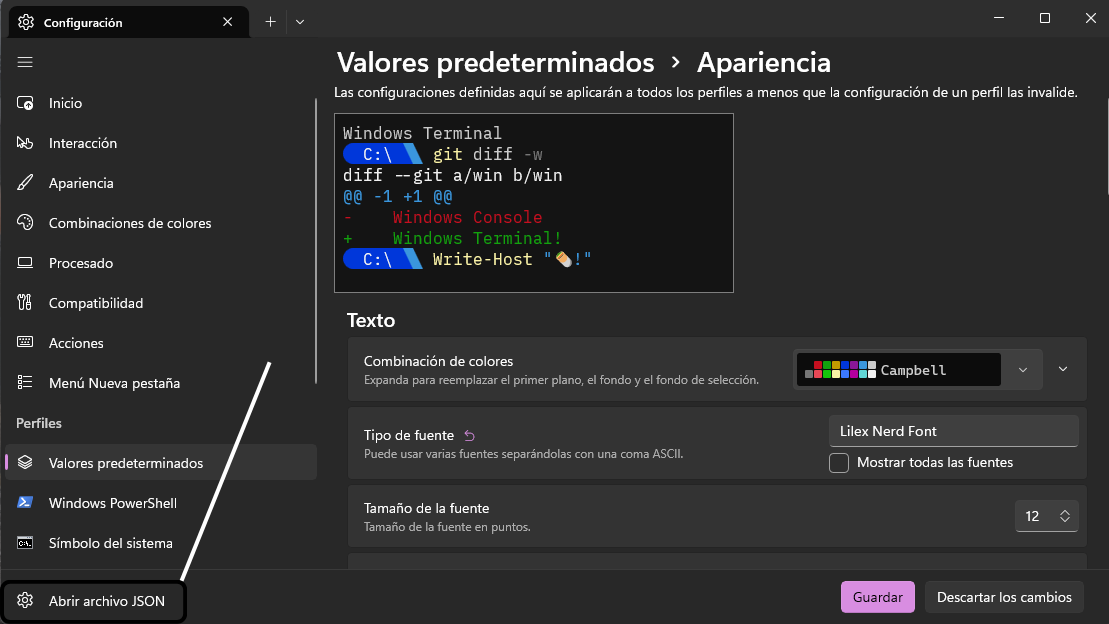
Now we need to edit the advanced settings. Click the "Open JSON file" button (usually at the bottom left of the settings).Ahora necesitamos editar la configuración avanzada. Hacemos clic en el botón para "Abrir archivo JSON" (suele estar abajo a la izquierda en la configuración).
9. Pasting the Scheme CodePegando el Código del Esquema (Schema) 🖋️
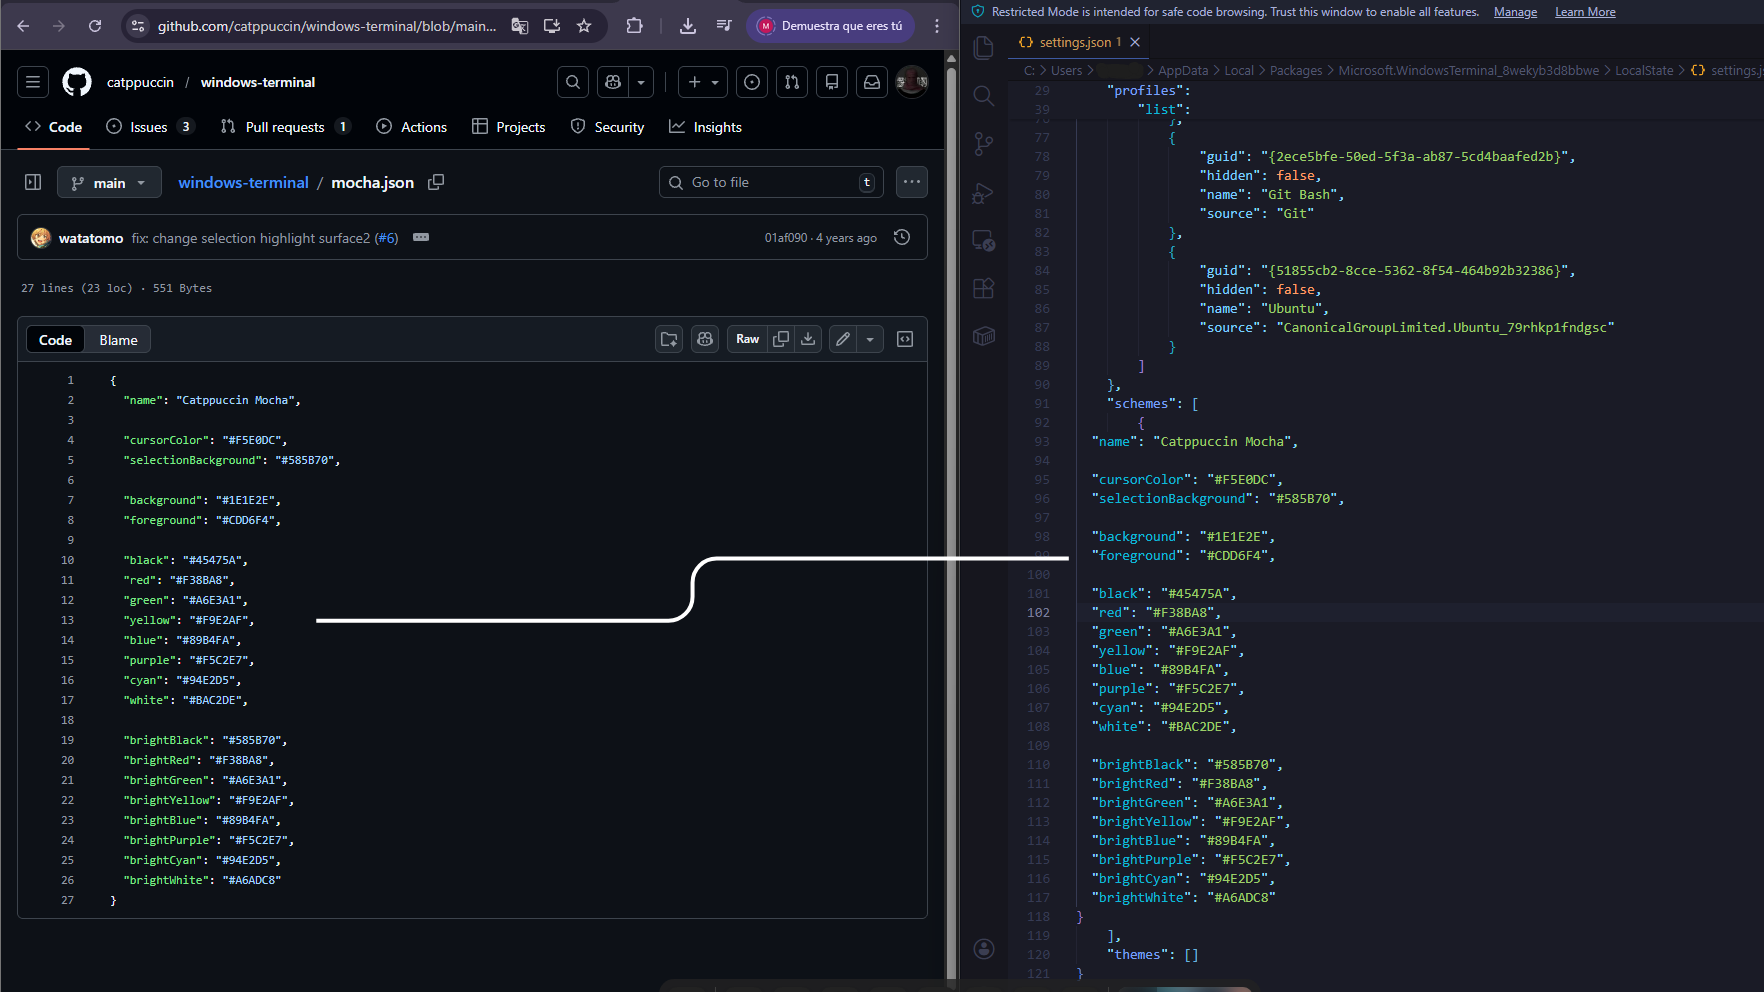
Inside the settings.json file, scroll to the end (or search) to find "schemes": [].Dentro del archivo settings.json, bajamos hasta el final (o buscamos) para encontrar "schemes": [].
Between the brackets [] we paste the contents of the mocha.json file.Entre los corchetes [] pegamos el contenido del archivo mocha.json.
Here's the direct link to the file: mocha.jsonAquí tienes el enlace directo al archivo: mocha.json
And the full repository: Catppuccin Windows TerminalY el repositorio completo: Catppuccin Windows Terminal
10. Adding ThemesAgregando Temas 🌈
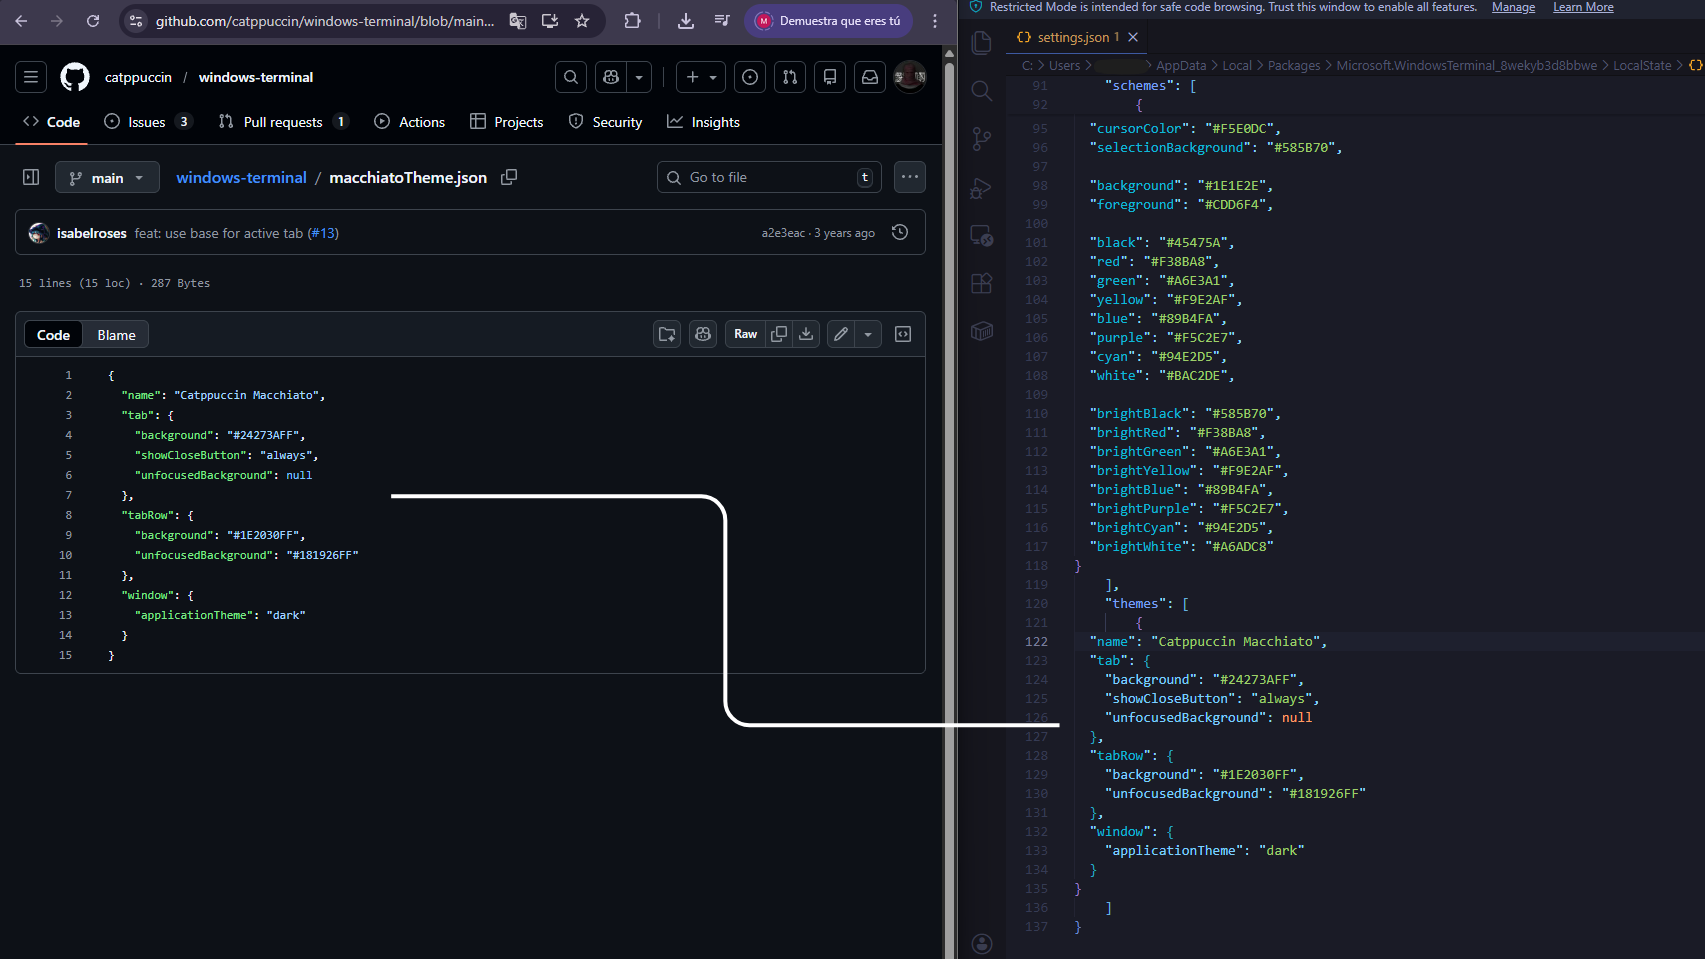
Now find the "themes": [] section (careful, it's different from schemes).Ahora buscamos la sección "themes": [] (ojo, es diferente a schemes).
Between the brackets [] we paste the contents of the macchiatoTheme.json file.Dentro de los corchetes [] pegamos el contenido del archivo macchiatoTheme.json.
Here's the direct link: macchiatoTheme.jsonAquí tienes el enlace directo: macchiatoTheme.json
And the repository: Catppuccin Windows TerminalY el repositorio: Catppuccin Windows Terminal
11. Selecting the Theme (Mocha)Seleccionando el Tema (Mocha) ☕
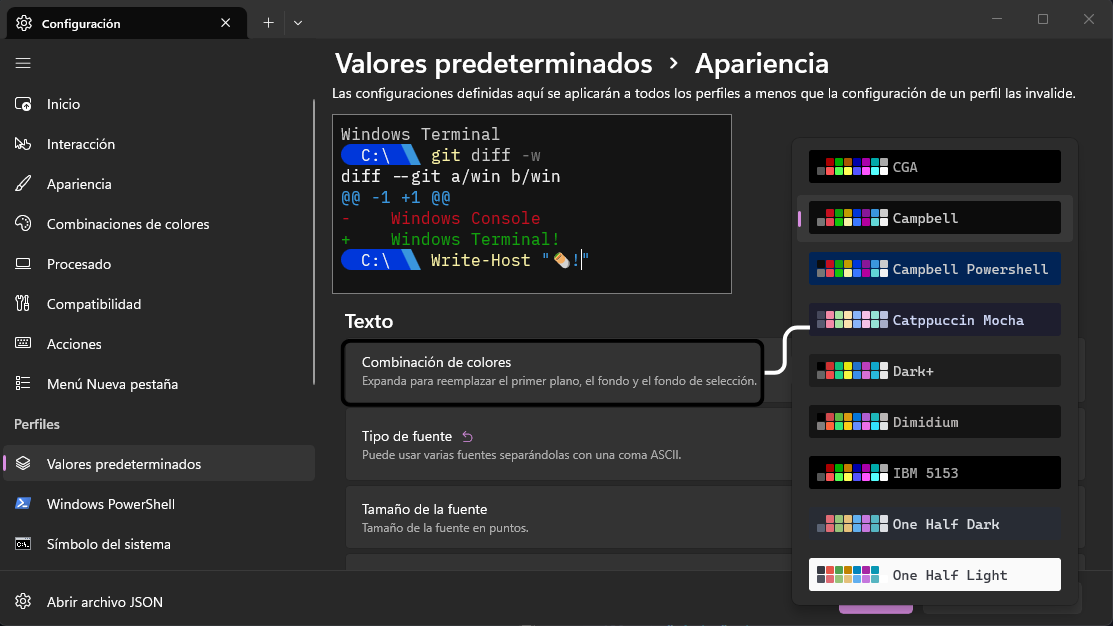
Back in the Terminal's visual settings, under "Color scheme", find and select the "Mocha" theme.Volvemos a los ajustes visuales de la Terminal, en "Combinación de colores", buscamos y seleccionamos el tema "Mocha".
12. Installing StarshipInstalando Starship 📦
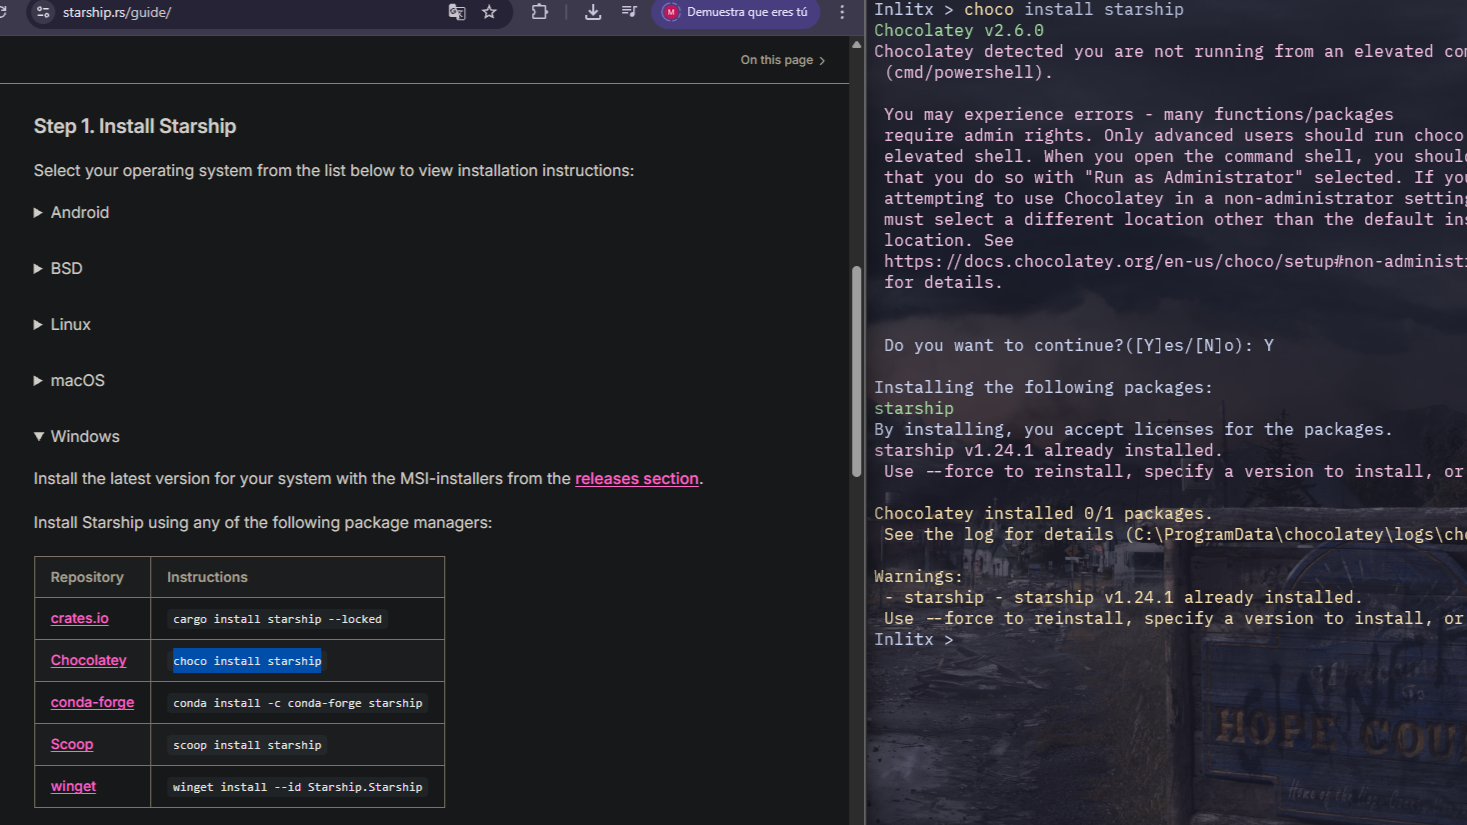
Now let's install Starship.Ahora vamos a instalar Starship.
Run the following command in the terminal:Ejecutamos el siguiente comando en la terminal:
choco install starship
Getting an error that you don't have Chocolatey?¿Te sale error de que no tienes Chocolatey?
If you don't have it installed, then yes, you need to open a terminal as Administrator and paste this command to install Chocolatey first:Si no lo tienes instalado, entonces sí necesitas abrir una terminal como Administrador y pegar este comando para instalar Chocolatey primero:
Set-ExecutionPolicy Bypass -Scope Process -Force; [System.Net.ServicePointManager]::SecurityProtocol = [System.Net.ServicePointManager]::SecurityProtocol -bor 3072; iex ((New-Object System.Net.WebClient).DownloadString('https://community.chocolatey.org/install.ps1'))
For more help, here's the official Chocolatey install page. It's very simple: just one command.Para más ayuda, esta es la página oficial de instalación de Chocolatey. Es muy sencillo: solo un comando.
13. Setting Up the User ProfileConfigurando el Perfil de Usuario 👤
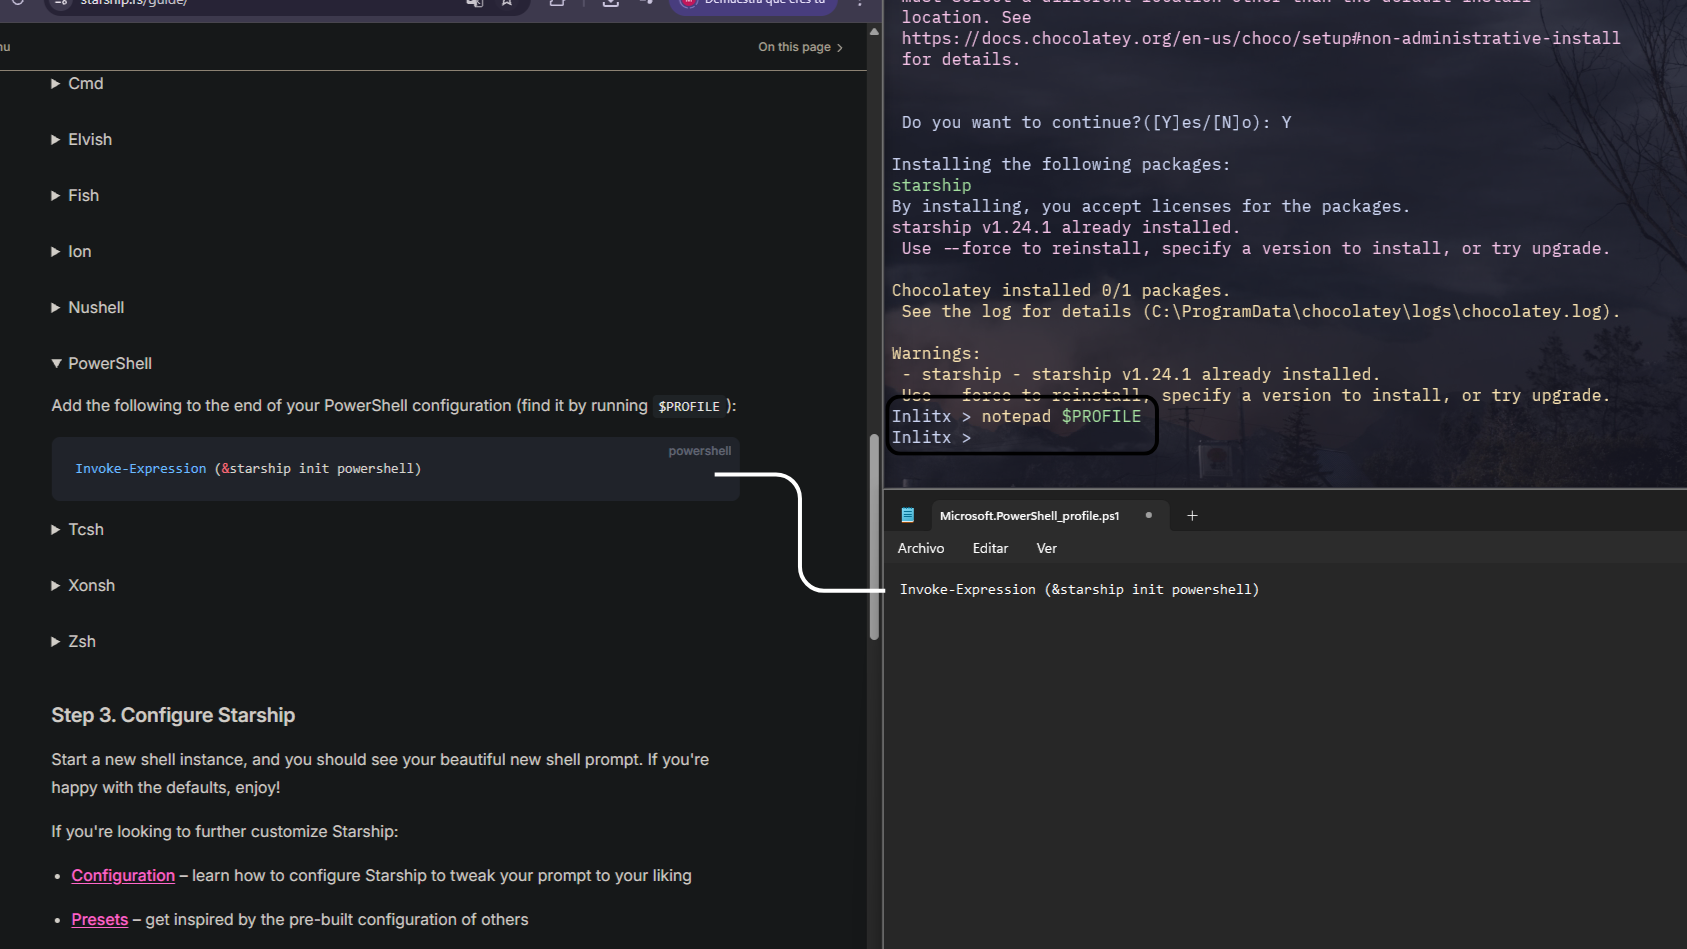
In the terminal, type the following command to open your PowerShell profile file:En la terminal, escribe el siguiente comando para abrir tu archivo de perfil de PowerShell:
notepad $PROFILE
If it says it doesn't exist, accept to create it. Once open, paste the code you need and save the changes.Si te dice que no existe, acepta crearlo. Una vez abierto, pegamos el código necesario y guardamos los cambios.
14. Applying a Starship PresetAplicando un Preset de Starship 🌟
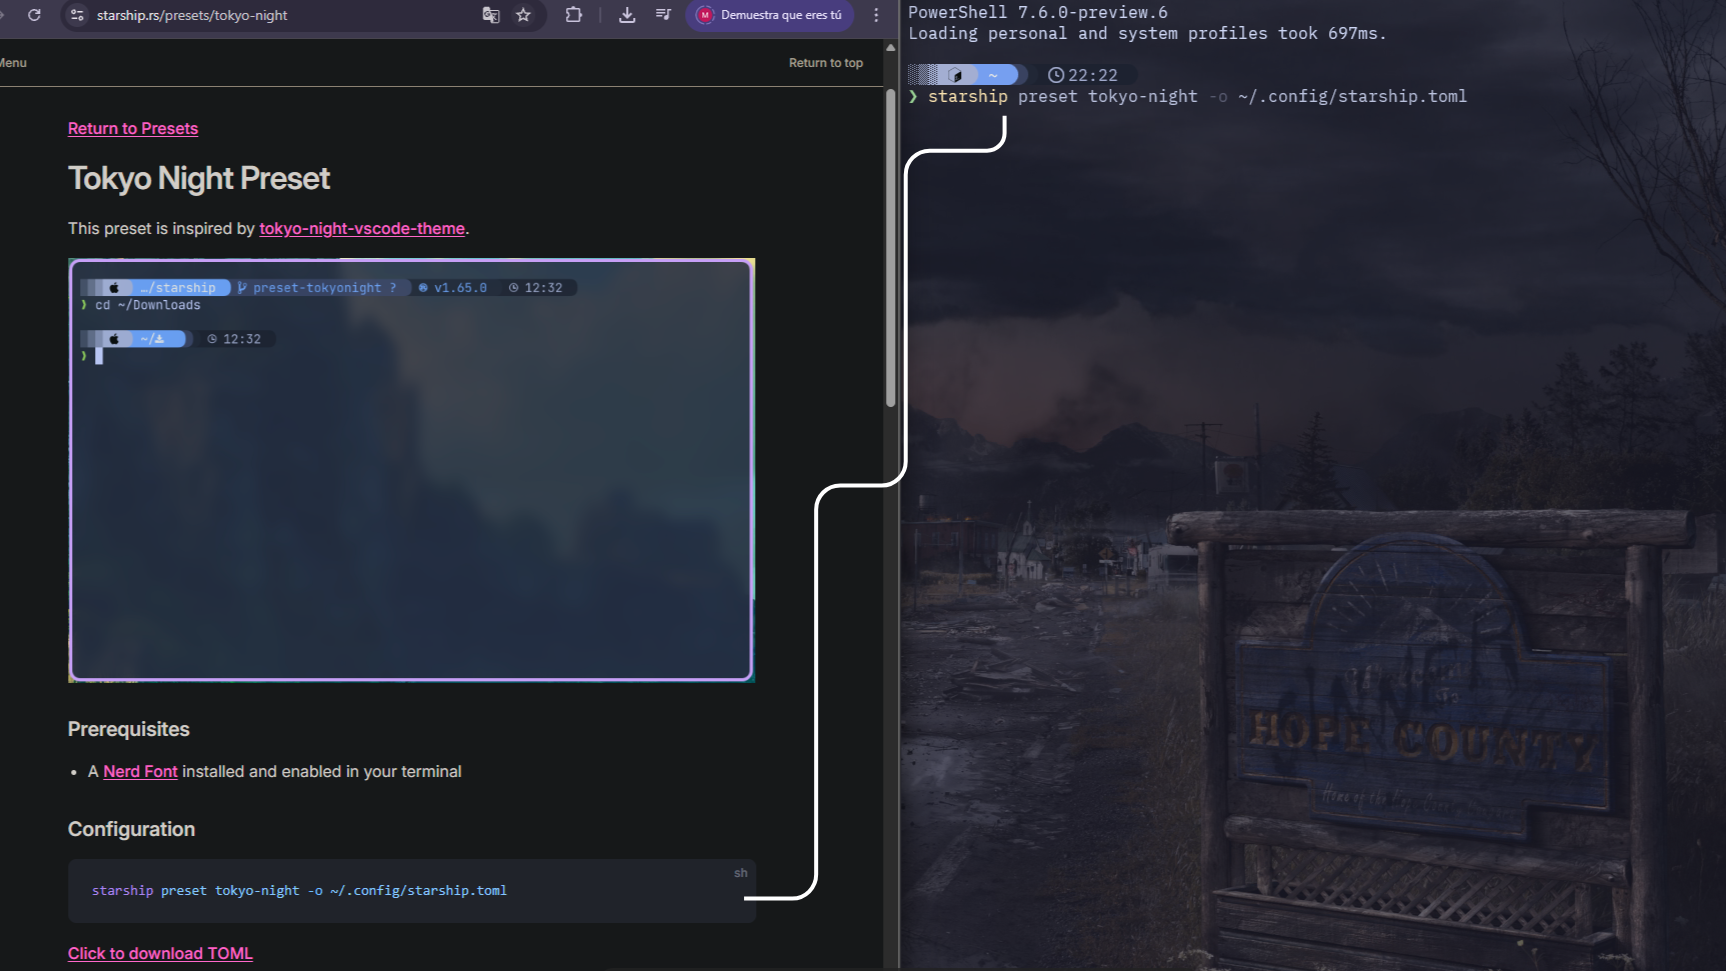
Go to the Starship Presets page.Vamos a la página de Presets de Starship.
To apply the "Tokyo Night" preset (the one in the image), use this command in the terminal:Para aplicar el preset "Tokyo Night" (el de la imagen), usamos este comando en la terminal:
starship preset tokyo-night -o ~/.config/starship.toml
There are other designs; if you want a different one, the install method is the same.Hay otros diseños; si quieres otro, el modo de instalación es el mismo.
15. Changing the Icon (Logo)Cambiando el Icono (Logo) 🏷️
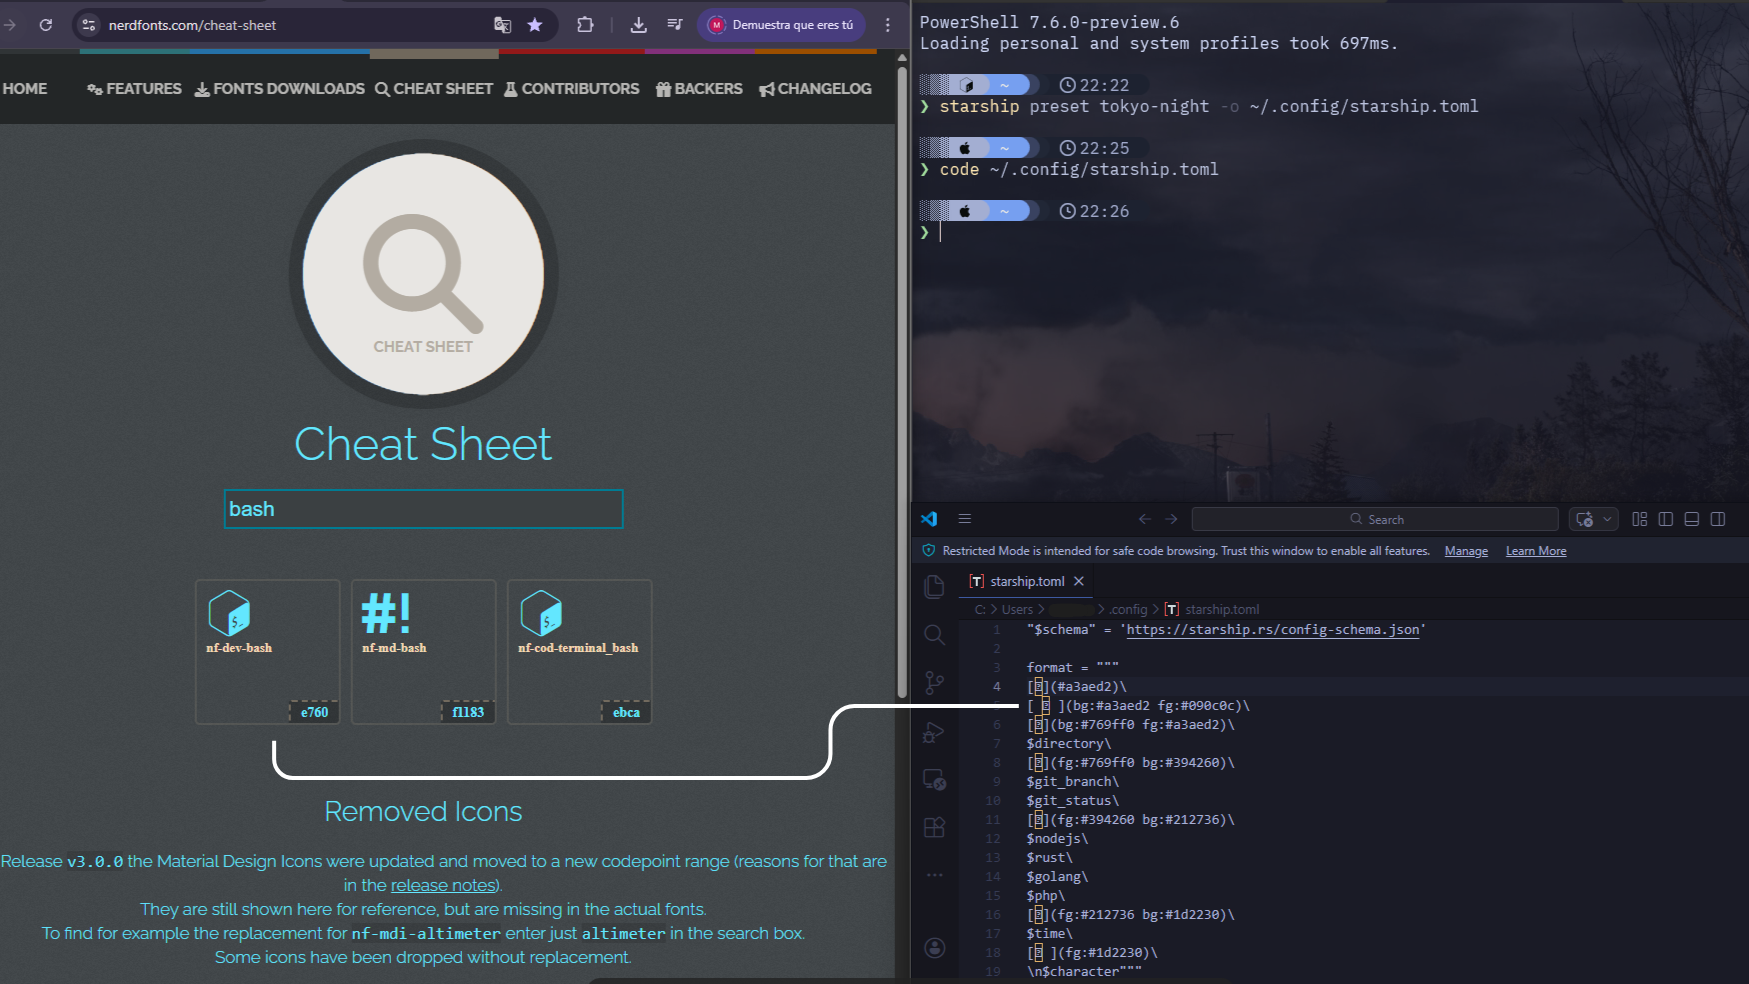
Use this site: Nerd Fonts Cheat Sheet.Usamos esta web: Nerd Fonts Cheat Sheet.
Find the icon you want for the logo. When you hover over it, click "Icon" to copy it. Go to where the arrow points in the image, delete what's inside the brackets [], paste the icon you copied and save.Busca el icono que quieras para el logo. Cuando pases el ratón por encima, haz clic en "Icon" para copiarlo. Vete a donde señala la flecha en la imagen, elimina lo que hay dentro de los corchetes [], pega el icono que copiaste y guarda.
16. Installing FastfetchInstalando Fastfetch ⚡
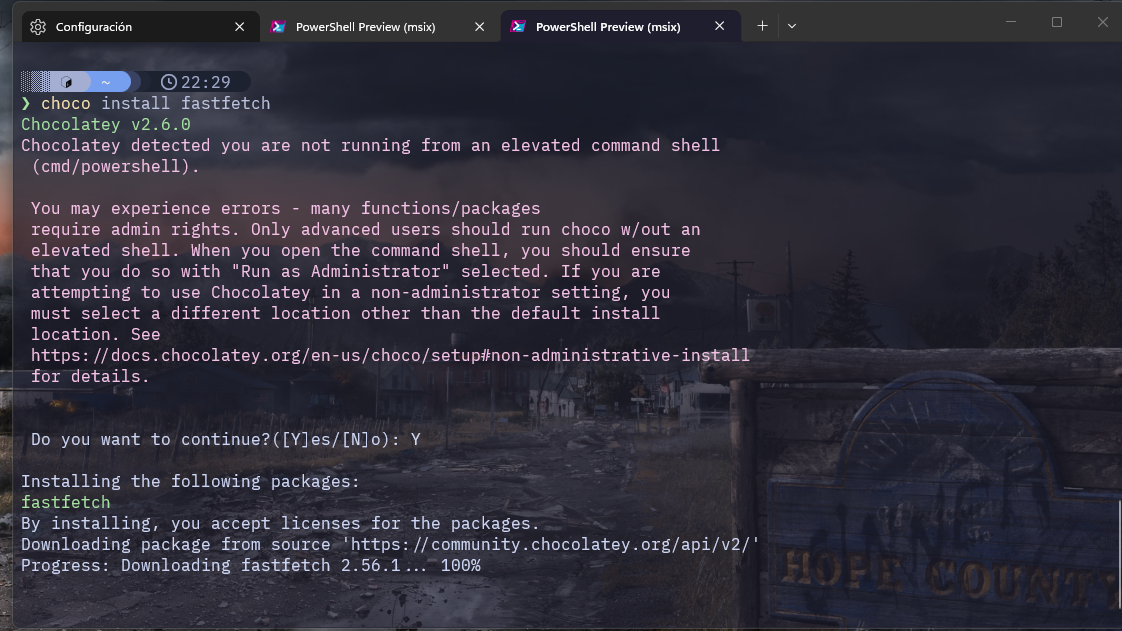
Now let's install Fastfetch using this command:Ahora sí, instalamos Fastfetch usando este comando:
choco install fastfetch
17. Generating Fastfetch ConfigGenerando Configuración de Fastfetch 🔨
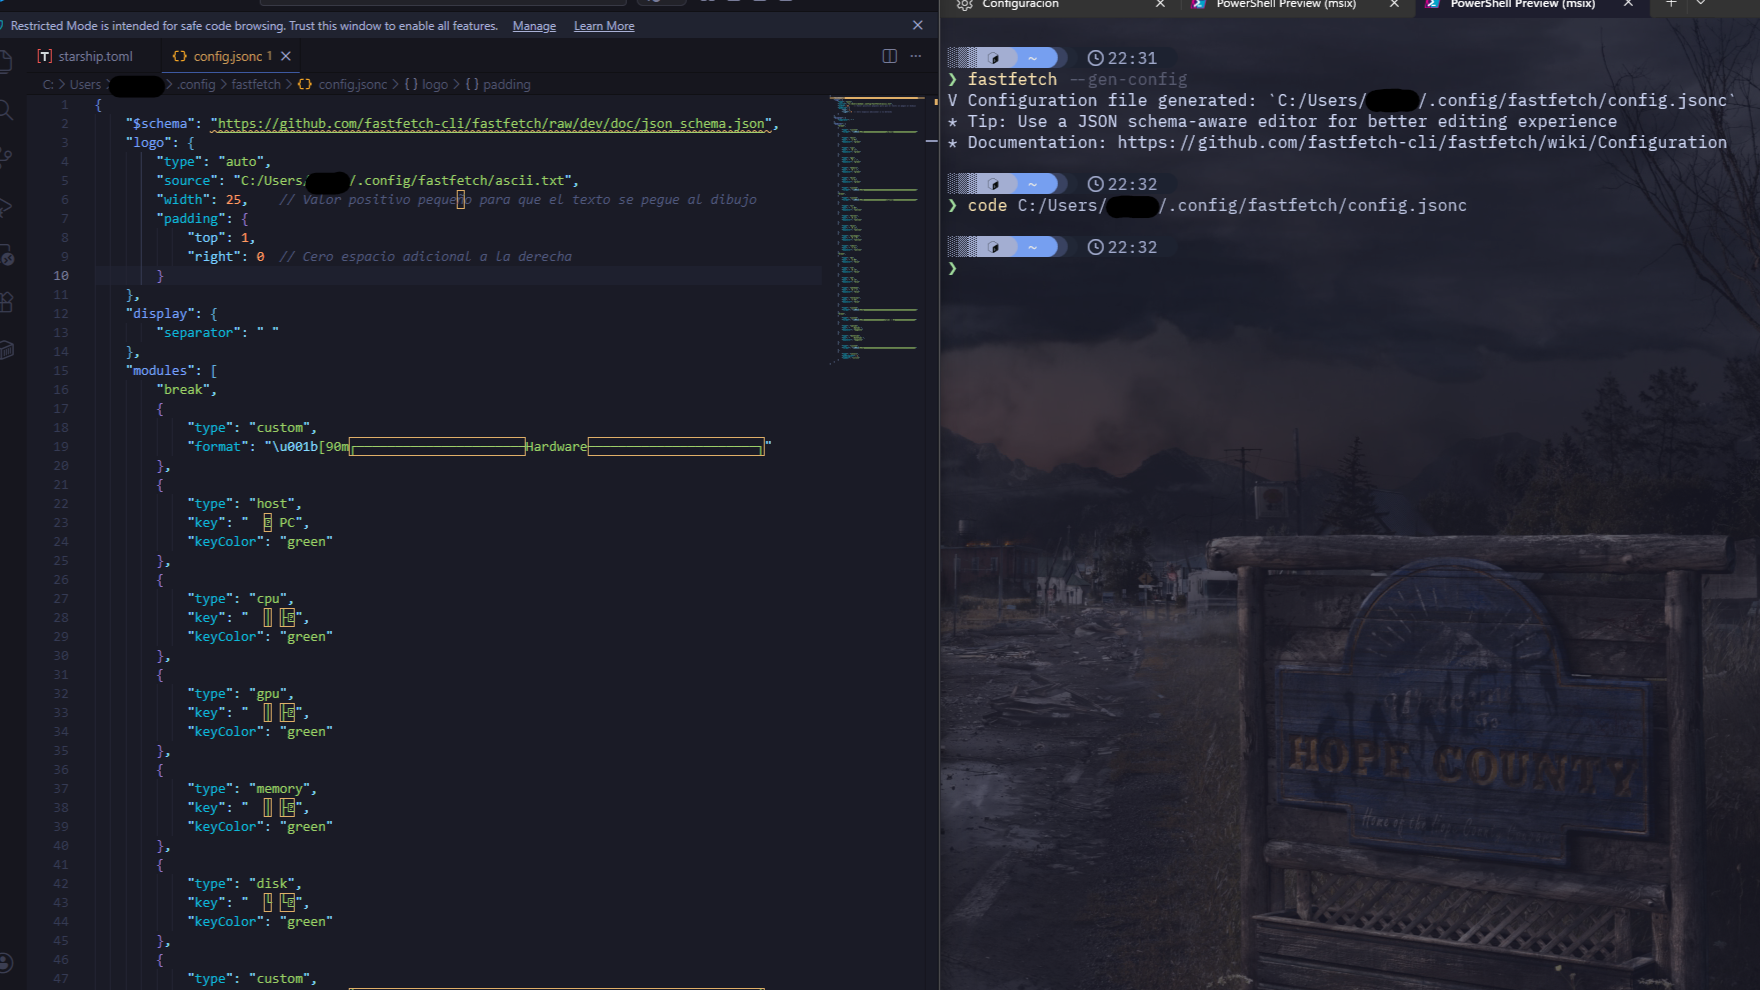
Run the fastfetch --gen-config command. Copy the path it gives you and open that file in VS Code.Ejecutamos el comando fastfetch --gen-config. Copiamos la ruta que nos da y abrimos ese archivo con VS Code.
Delete ALL the default content and paste this config (change "USER" for your Windows username):Borramos TODO el contenido que viene por defecto y pegamos esta configuración (cambia "USER" por tu usuario de Windows):
{
    "$schema": "https://github.com/fastfetch-cli/fastfetch/raw/dev/doc/json_schema.json",
    "logo": {
        "type": "auto",
        "source": "C:/Users/USER/.config/fastfetch/ascii.txt",
        "width": 25,    // Valor positivo pequeño para que el texto se pegue al dibujo
        "padding": {
            "top": 1,
            "right": 0  // Cero espacio adicional a la derecha
        }
    },
    "display": {
        "separator": " "
    },
    "modules": [
        "break",
        {
            "type": "custom",
            "format": "\u001b[90m┌──────────────────────Hardware──────────────────────┐"
        },
        {
            "type": "host",
            "key": "   PC",
            "keyColor": "green"
        },
        {
            "type": "cpu",
            "key": "  │ ├",
            "keyColor": "green"
        },
        {
            "type": "gpu",
            "key": "  │ ├",
            "keyColor": "green"
        },
        {
            "type": "memory",
            "key": "  │ ├",
            "keyColor": "green"
        },
        {
            "type": "disk",
            "key": "  └ └",
            "keyColor": "green"
        },
        {
            "type": "custom",
            "format": "\u001b[90m└────────────────────────────────────────────────────┘"
        },
        "break",
        {
            "type": "custom",
            "format": "\u001b[90m┌──────────────────────Software──────────────────────┐"
        },
        {
            "type": "os",
            "key": "   OS",
            "keyColor": "yellow"
        },
        {
            "type": "kernel",
            "key": "  │ ├",
            "keyColor": "yellow"
        },
        {
            "type": "bios",
            "key": "  │ ├",
            "keyColor": "yellow"
        },
        {
            "type": "packages",
            "key": "  │ ├",
            "keyColor": "yellow"
        },
        {
            "type": "shell",
            "key": "  └ └",
            "keyColor": "yellow"
        },
        "break",
        {
            "type": "de",
            "key": "   DE",
            "keyColor": "blue"
        },
        {
            "type": "lm",
            "key": "  │ ├",
            "keyColor": "blue"
        },
        {
            "type": "wm",
            "key": "  │ ├",
            "keyColor": "blue"
        },
        {
            "type": "wmtheme",
            "key": "  │ ├",
            "keyColor": "blue"
        },
        {
            "type": "terminal",
            "key": "  └ └",
            "keyColor": "blue"
        },
        {
            "type": "custom",
            "format": "\u001b[90m└────────────────────────────────────────────────────┘"
        },
        "break",
        {
            "type": "custom",
            "format": "\u001b[90m┌────────────────────Uptime / DT────────────────────┐"
        },
        {
            "type": "uptime",
            "key": "    Uptime ",
            "keyColor": "magenta"
        },
        {
            "type": "datetime",
            "key": "    DateTime ",
            "keyColor": "magenta"
        },
        {
            "type": "custom",
            "format": "\u001b[90m└───────────────────────────────────────────────────┘"
        },
        {
            "type": "colors",
            "paddingLeft": 2,
            "symbol": "circle"
        }
    ]
}
18. Adding Custom ASCII ArtAñadiendo ASCII Art Personalizado 🎨
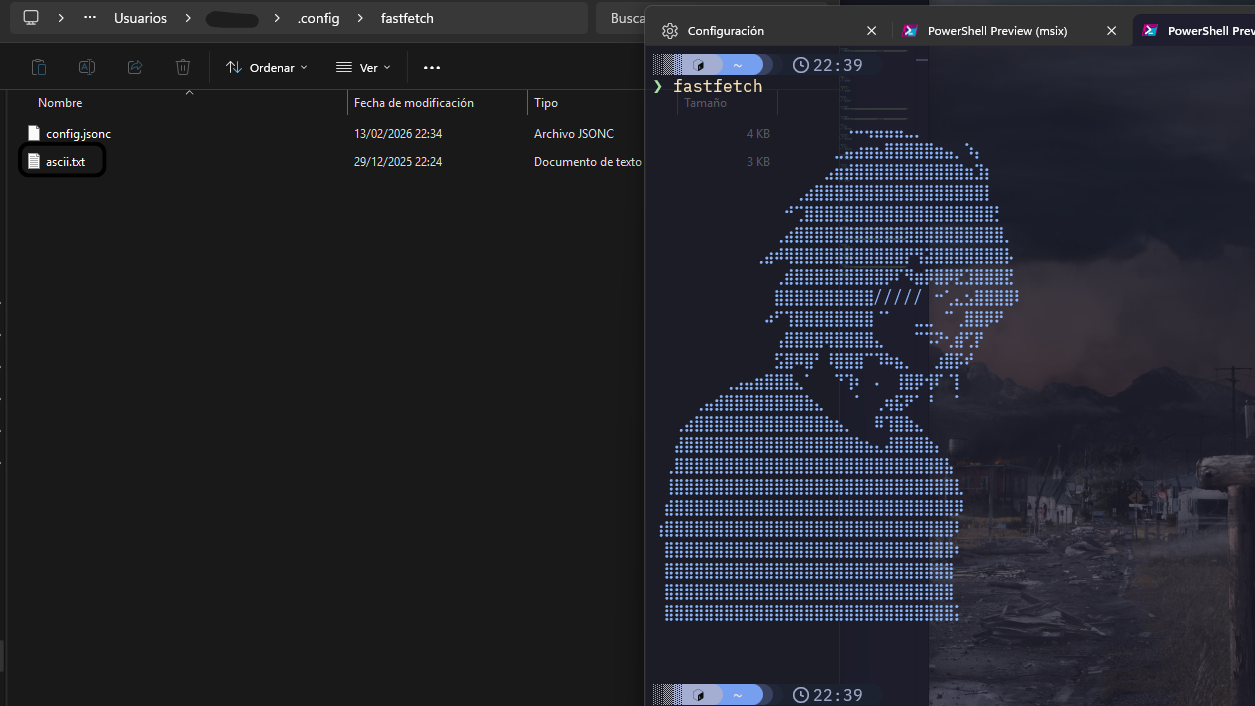
Go to the Fastfetch config folder. Create a .txt file with your ASCII art (the drawing made of letters). Make sure the path in the JSON points to this .txt file.Vamos a la carpeta de configuración de Fastfetch. Creamos un archivo .txt con tu arte ASCII (el dibujo hecho con letras). Asegúrate de que la ruta en el JSON apunte a este archivo .txt.
19. Auto StartInicio Automático 🚀
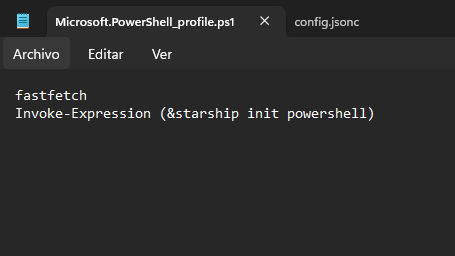
So that Fastfetch runs every time you open the terminal (and you don't have to type it manually), open your profile file again and write fastfetch at the end. Save and you're done.Para que Fastfetch se ejecute siempre que abras la terminal (y no tengas que escribirlo manualmente), abre tu archivo de perfil nuevamente y escribe fastfetch al final. Guarda y listo.
For the changes to take effect, close the terminal and open it again.Para que los cambios hagan efecto, cierra la terminal y vuélvela a abrir.
20. Final ResultResultado Final 🏆
That's it! This is how your customized terminal should look. Enjoy your new workspace.¡Ya está! Así es como debería quedar tu terminal personalizada. Disfruta de tu nuevo entorno de trabajo.